How Restorative Yoga Can Help With Trauma Recovery + 9 Poses To Try

Restorative yoga is a self-care practice that supports stress reduction and can aid in recovery from trauma. It is well established that trauma and stress are not just mental constructs but actually exist in the body.
The body has an awareness that is deeply visceral, different from cognitive awareness. Restorative yoga supports embodied awareness, which is awareness that reaches deep into the nervous system, where contracted states caused by stress and trauma can release. This is where profound and lasting change takes place.
The poses being suggested support embodied awareness and enhance an overall sense of well-being. Ease is emphasized in this practice to evoke the relaxation response, which aids in rest, repair, recovery, and resilience. The postures, done with the support of props and held for extended periods of time, counteract fatigue, energize, relax overall muscle tension, restore homeostasis, and support emotional balance.
In this practice, first you find the form of the pose, and then you make any adjustments that are necessary to make yourself as comfortable as possible.
The suggested poses are illustrated to give you a visual example of the form, accompanied by a description of how to get into the posture. Once you have found the form of the pose, make whatever adjustments you need to make so the pose is as comfortable as possible. The props are used to support you so that you do not have to stretch or use any muscle energy.
Covering yourself with a blanket for warmth is important as your body temperature will likely drop as you come into deep states of relaxation. You may find that you need to use more than the minimum number of props suggested, or you may need fewer than the suggested number to be comfortable.
This is your practice. Remember, in this practice you want to experience ease. Your body will tell you what is optimal. You do not have to put up with any discomfort whatsoever. Let common sense guide you in your selection of poses. Some may be more comfortable and more beneficial than others.
Legs up the wall (viparita karani)
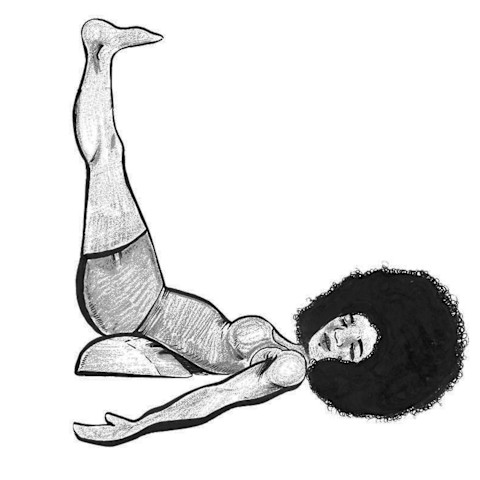
How to: To perform this receptive inversion, start by sitting on the floor against a wall, knees slightly bent, feet flat on the floor with your right shoulder, hip, and thigh against the wall.
Place your hands on the floor hip-distance apart and slightly behind your hips, fingers facing forward. Begin to lower yourself onto your back, bending your elbows back behind as you swing your legs up the wall.
Once your legs are up the wall, scoot your hips as close to the wall as is comfortable. Keep a bolster, or a folded blanket in a rectangular shape, within reach. Bend your knees, press the soles of your feet into the wall, lift your hips, and slide the bolster or blanket underneath them.
Straighten your legs and extend them back up the wall. Extend your arms out to the sides, palms facing up, if comfortable, or place your arms in cactus position. If you choose cactus position, lift your arms out to the sides of your body in the shape of a "T" at shoulder height. Bend your elbows to 90 degrees. Keep your upper arms horizontal and bend your forearms back behind you until the backs of your hands are flat on the ground.
If extra support is needed, place a small neck roll (made from a hand towel, for example) under your neck to support and lengthen the cervical spine. Rest in this pose for up to 15 minutes.
When ready, bend your knees and press the soles of your feet into the wall and lift your hips to slide the bolster out from under you. Gently lower your pelvis to the floor, and with knees still bent, roll to the right side, walking your feet down the wall, coming into a fetal position. Pause, enjoy your breath, tuck your chin, and use your hand to press yourself back up to sitting.
Note: This is not recommended for women who are on their moon cycle or after the third month of pregnancy.
Supported resting pose (savasana)
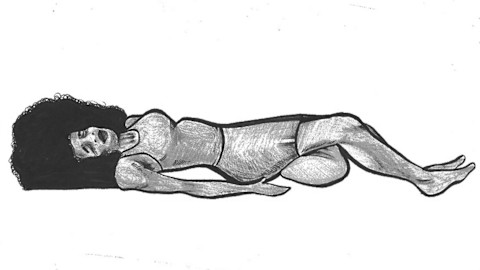
How to: Sit on the floor with your legs slightly bent. Slide a bolster or blanket roll beneath your knees and slowly lower your back, neck, and then head onto the floor. If your cervical spine needs support, place a small rolled-up hand towel or neck roll in the curve of the cervical spine to lengthen it, then place your head on the floor.
Let your arms rest comfortably by your sides, preferably palms facing up to broaden and place your shoulder blades more squarely on your back. Close your eyes or use an eye pillow if you are comfortable doing so. Become aware of your natural rhythmic breath, and let go of any tension you may feel.
Rest here for 5 to 20 minutes. When you are ready to come out of this pose, roll onto your right side, coming into a fetal position; pause here, take two or three breaths, tuck your chin into your chest, and gently press your hands into the floor to lift back up to sitting.
Note: This is not recommended for women who are more than three months pregnant.
Supported side bend (supta ardha chandrasana)
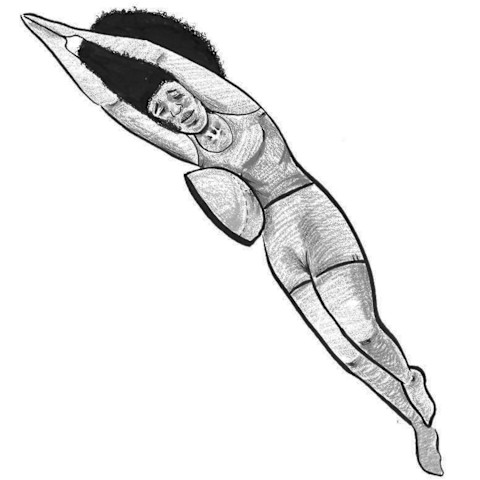
How to: Place a bolster or a blanket roll horizontally in the middle of your mat. Sit with your right hip against the short end of your bolster or blanket roll; your legs are softly bent behind you with one leg on top of the other.
Place a square folded blanket, block, or pillow between your knees, and lean to the right. Place your right hand across the top of your bolster toward the far side of your mat and lower over the bolster onto your right side.
Once lowered onto the bolster, extend your right arm straight along the ground with your palm facing up and rest your head on your biceps. Extend your left arm straight up overhead with your palm facing the short edge of the mat.
Lower your arm over your ear until both right and left palms touch. Feel the length in your left side body. Observe your breath and notice how it guides the movements of your spine as you lengthen and release.
Relax your entire body and pay special attention to your neck and side body as the breath circulates from front to back and around your rib cage. When you are ready to switch sides, slowly turn your body facedown, pause, enjoy your breath, and then gently press your hands into the ground to rise up. Repeat on the other side.
Hold on each side for 2 to 10 minutes. When you are ready to come out of this pose, take two or three deep diaphragmatic breaths, tuck your chin into your chest, and gently press your hands into the floor to lift back up to sitting.
Note: If you are more than three months pregnant, instead of lying across a bolster, lie on the left side of the body in fetal position.
Child's pose (balasana)
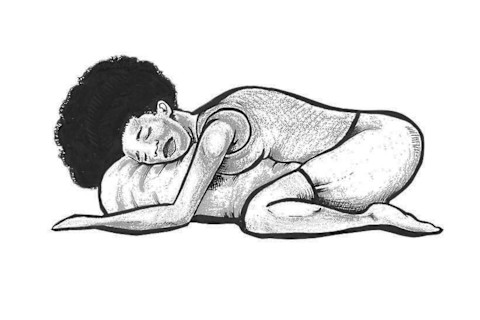
How to: Create a support of firm pillows, blankets, or a bolster lengthwise on your mat in front of you. Lower onto your hands and knees, placing them on either side of the support, knees open wide toward the edges of your mat; the tops of your feet are flat on the floor behind you with big toes touching.
If needed, place a folded blanket under your knees or under the tops of your feet for comfort. Sit back onto your heels and, without lifting your hips, fold your torso forward over the length of the bolster or blankets. If your hips are tight, lift up and place a bolster or blanket roll under your hips or behind your knees for support. Place your forearms and the palms of your hands flat on either side of the bolster, or, if it is more comfortable, bend your elbows and interlace your fingers around the top edge of the support.
Turn your head to one side or the other, resting on your cheek, or rest your forehead on the bolster—whichever is most comfortable. Let gravity pull your legs and hips toward the earth as you round your lower back and release your tailbone toward your heels.
Halfway through, turn your head to the other side as your body continues to settle into the pose. Hold this pose for 5 to 10 minutes on each side. When you are ready to come out of this pose, take two or three deep breaths and gently press both hands into the floor to lift up to sitting on your heels.
Note: This is not recommended for women who are more than three months pregnant.
Wide-legged seated forward fold (upavistha konasana)
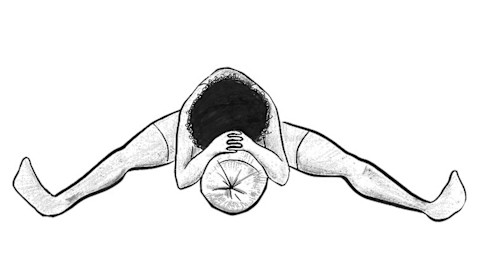
How to: Sit on a blanket folded into a rectangular shape facing the long side of your mat and open your legs to a wide V position. Place the narrow end of the bolster between your legs. Fold forward from your groin, not your waist, and rest your forehead on the bolster.
You should feel your legs and back body lengthening but not stretching. Use as much elevation on top of the bolster as you need to keep from overstretching in this forward fold. You can do this by placing as many blocks as you need on top of the bolster for a headarest as you come into the forward fold. Your range of motion will determine how high your support needs to be.
Rest your forehead on the support or turn your head to the side and rest your cheek on it. Use a square folded blanket or a rectangular folded blanket to cushion your head if you like. Rest your arms on either side of the bolster or drape them over the top.
Hold this pose for 5 to 10 minutes. When you are ready to come out of this pose, tuck your chin into your chest, and lift your torso to an upright position, remove the bolster, place your hands behind your knees, and gently lift them until your feet are flat on your mat.
Note: This is not recommended for women who are more than three months pregnant.
Supported facedown relaxation pose (downward-facing savasana)
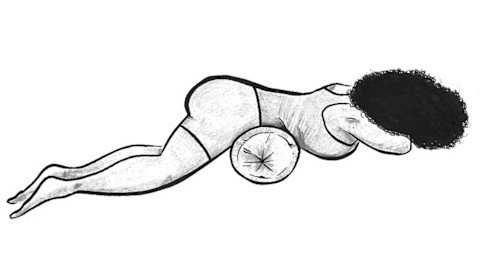
How to: Place a bolster, rectangular folded blanket, or rolled blanket horizontally across the middle of your mat. Facing the top end of your mat, kneel at the bolster or blanket. Position your hips at the bolster or blanket, and lay your torso across the top so that your hips are raised on it.
Extend your arms forward with bent elbows, and place one hand on top of the other, creating a cushion for your head. Lower your forehead onto your hands or turn your head to one side, resting on your cheek. Let your legs and feet relax, and let your heels fan out toward the outer edges of your mat while your toes turn in.
Hold this pose for 5 to 20 minutes. Focus on your breath. When you are ready to come out of this pose, press your hands into the floor and, with your chin tucked, lift yourself back of the bolster or blanket, and come into child's pose with your arms draped horizontally over the bolster. Hold here for at least five full diaphragmatic breaths and then lift up to sitting.
Note: This is not recommended for women who are more than three months pregnant.
Supported side twist (salamba bharadvajasana)
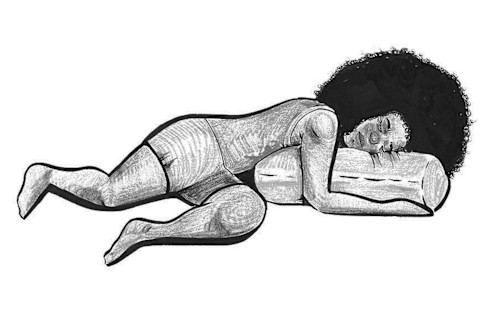
How to: Place your bolster or three rectangular folded blankets stacked on top of each other vertically in the middle of your yoga mat. Sit with your right hip snug up against the narrow end of the bolster.
Bend both knees, taking your shins to the left and resting your left ankle in the arch of your right foot. Lift up from your sternum and twist your belly toward the right to square your torso to the front of your mat. Fold over the bolster from this position.
Rest your right cheek on the bolster so that your head is facing the same direction as your knees. Keep the back of your neck long and the front of your neck soft. Rest your forearms and hands along the sides of the bolster.
Now notice how your breath slows down and deepens. Observe how your inhalations and exhalations root your pelvis and enhance the turning sensation in your belly and shoulders. Do you root more deeply into your pelvis when you inhale or when you exhale? Do you lengthen and move deeper into the twist when you inhale or when you exhale?
When you are ready, change sides. Hold this pose for up to 15 minutes on each side. When you are ready to come out of this pose, press both hands into the floor, tuck your chin into your chest, and come up to sitting, lifting your head last.
Supported bridge pose (setu bandha sarvangasana)
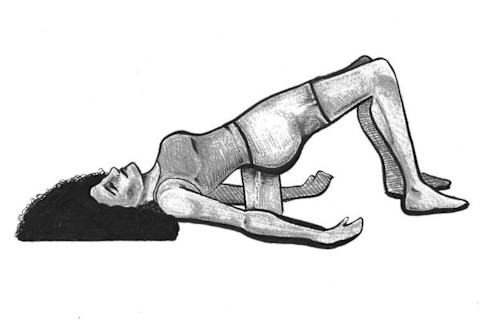
How to: Lie on your mat. Bend your knees with your feet flat on the mat about hip-distance apart and about 6 inches from your buttocks. Lift your hips, and place a block, bolster, or folded blanket under your hips. Choose the height that feels best under your lower back. Remember that comfort, not intensity, is key.
Lower your hips onto the prop you have chosen. Relax with your arms extended along the sides of your body and your palms facing up, or in cactus position. If you choose cactus position, lift your arms out to the sides of your body in the shape of a "T" at shoulder height. Bend your elbows to 90 degrees. Keep your upper arms horizontal and bend your forearms back behind you until the backs of your hands are flat on the ground.
Focus your awareness on your breath. Remain in this pose for a minimum of 3 minutes to a maximum of 10 minutes. When you are ready, lift your hips, remove the prop, and lower yourself to the floor. Roll onto your right side, coming into a fetal position, and rest here for 5 to 10 full breaths. Tuck your chin into your chest and use the strength in your arms to lift up to sitting, with your head following last.
Note: This is not recommended for women who are more than three months pregnant.
Supported reclining bound angle pose (supta baddha konasana)
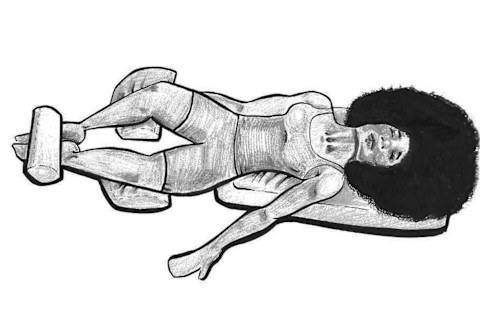
How to: Place a bolster or a narrow stack of three rectangular folded blankets vertically in the middle of your yoga mat. Place an additional folded blanket or a neck pillow at the top of your bolster to support your head or your neck. The lower edge of the blankets or bolster should come directly into contact with your buttocks to support your lower back.
Bring the soles of your feet together, touching as if in a prayer position, and spread your knees apart. Each knee fanned out to the side is supported by a yoga block, blanket roll, meditation cushion, or bolsters. Lower yourself onto your back over the bolster. If you like, cover your eyes with an eye pillow and cover your body with a blanket. Breathe deeply and surrender to gravity as you relax. This pose should be held for a minimum of 5 minutes and can be held for up to 20 minutes.
To come out of the pose, put the soles of your feet on the floor, bend your knees, and roll off the bolster onto your right side, coming into a fetal position. Pause there for 5 to 10 breaths and enjoy your breath. To come out of the pose, tuck your chin into your chest and use the strength of your arms to lift into a sitting position.
Note: This is not recommended for women after the third month of pregnancy unless a block is placed underneath the bolster at the top of the bolster, raising it to a slant and elevating the torso and head.
