
If you've been steadily practicing the basics of yoga, there's a chance you may be itching to broaden your horizons and incorporate some more advanced poses into your practice. While there is truth to the idea that any pose can be "challenging" when engaging all the right muscles, certain poses are definitely more advanced than others. Here are nine of my favorite advanced asanas, plus how to do them safely.
Note: Before trying any of these poses for the first time, make sure you properly warm up, start slow, and take the modifications if the full expression of the pose is too much.
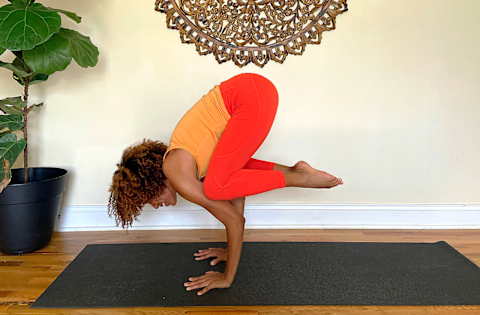
Crow pose (Kakasana)
How to:
- Come into a low squat with feet hip-width apart, heels lifted, and elbows on the inside of your knees.
- Begin to slowly lean forward, placing your hands on the floor in front of you, shoulder-width apart.
- Keeping your chin slightly forward, bend your arms so they make a 90-degree angle, pushing your hands into the floor and tilting your hips up. Your feet will start wanting to come off the ground.
- Slowly lift up one foot, maintaining the lift in the hips and the engagement of the core and arms.
- Once you're stable with one foot raised, begin to raise the other. Hold your gaze on the floor in front of you and keep the 90-degree bend in your elbows. Remember to keep sending the hips up.
- Hold for five full breaths and exit by placing your feet down and returning to the low squat.
Tips and modifications:
- Be sure to warm up your wrists before this pose.
- Use a strap around your upper arms to keep elbows from splaying out to the sides.
- Practice balancing by placing a yoga block on its shortest side under your feet. Rather than trying to lift both legs, focus on lifting one at a time for a few rounds.
- Place a pillow under your face if you're feeling fear around falling.
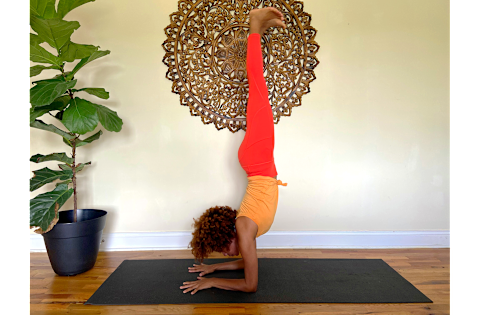
Forearm stand (Pincha Mayurasana)
How to:
- Set up in front of a wall. (As you get more comfortable, you won't need the wall anymore).
- Beginning in downward dog with your fingertips touching the wall, then lower onto your forearms to come into dolphin pose.
- With shoulders over elbows and gaze between the forearms, flex the right foot and inhale it up toward the wall. Hold here, keeping both hips in one line. Release and repeat on the opposite side.
- Back in dolphin, take one step in with your left leg and allow your right leg to lift, extending it up with some momentum.
- As the left leg follows and you find the wall, focus on stacking your hips over your shoulders and wrapping your shoulder blades around your spine.
- Slowly take the right leg away from the wall, sending it energetically toward the ceiling. When you're ready, bring the left leg to meet the right, squeezing them together in one line over your hips.
- Maintain your gaze and breathe. Hold for three to five breaths, or as long as you can. Release by dropping the legs back into dolphin.
Tips and modifications:
- Use a strap around your upper arms to keep elbows from splaying out to the sides.
- Place a block between the hands for extra support.
- Play around with opposite legs on the wall until you get a feel for balancing.
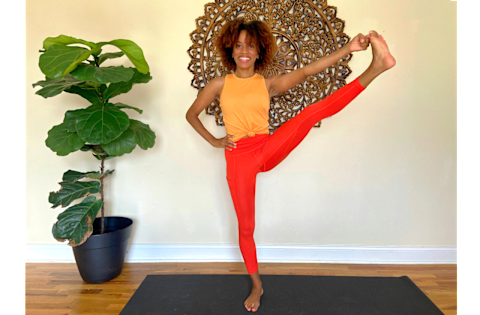
Hand-to-foot pose (Utthita Hasta Padangustasana)
How to:
- Begin from mountain pose and draw your left knee to your belly.
- Taking the left hand to the inside of your left thigh, reach for the outside of your left foot.
- With a solid standing right leg, extend your left leg out in front of you. Breathe.
- Once you're ready, swing your left leg out to the left.
- Hold for 30 seconds and release back to mountain pose. Repeat on the other side.
Tips and modifications:
- Loop a strap around your foot if you can't reach it, and extend the leg at the same time.
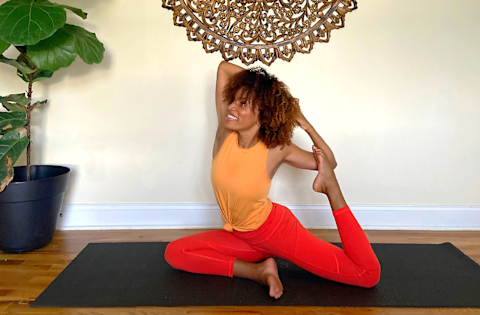
Mermaid (Eka Pada Rajakapotasana)
How to:
- Starting from tabletop, slide your right leg forward, dropping your knee by your right wrist.
- Extend the left leg back in a straight line from your hip, and allow your right shin to rest on the ground, with your right foot in front of your left hip.
- Lean forward to stretch out the right hip for a few breaths before pushing yourself up, so your torso is upright with a proud chest.
- Bring your left hip slightly forward to come in line with the right. Send your tailbone down, and tilt your hips slightly forward. This opens up space in your low back before the backbend.
- Bring your hands to your hips and push slightly down, allowing the motion to help you stretch up and back with your chest. Feel each vertebra and rib bend back. Drop your head back and shine your chest toward the ceiling.
- Keeping the positioning of your hips, allow your right hand to rest on your right thigh. Bend your left knee and reach your left hand back, grabbing the inside of the left foot. Place your left foot in the crease of your left elbow, and press into the arm.
- With a long, strong spine, reach your right arm up and overhead, and hold your hands together behind your head.
- Keep your body square to the front of the mat and maintain the motion of sending your chest up and back.
- Gaze up softly and hold for five breaths. Exit by releasing the left leg back behind you, and flow through chaturanga, upward dog, and downward dog. Repeat on the opposite side.
Tips and modifications:
- You can place a block under the glute, of whichever leg is bent parallel to the front of the mat, to allow hips to remain square.
- If you can't get your foot to your elbow, you can hold the pose at step No. 5, focusing on working that flexibility.
- Other backbends and hip openers such as wheel, butterfly, pigeon, lizard, and cobra will help build a solid foundation for this pose.
Lotus (Padmasana)
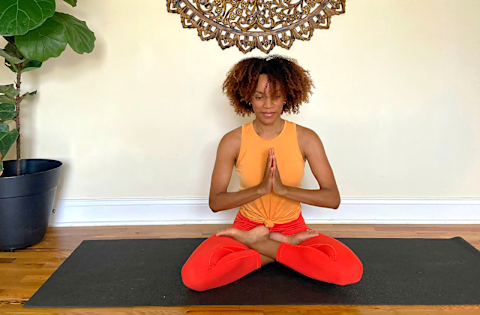
How to:
- Sit down on your mat with legs extended in front of you. Bringing the right leg toward you, position the knee in your right elbow and the ankle in your left elbow.
- Try to grab opposite hands around your shin, and gently rock around here, loosening up the hip.
- Bend your left leg out, like one-half of a cross-legged seat, with right leg still in your arms.
- Bring your right foot to your left hip, flexed, pressing down into your groin. Hold for a moment.
- Lean forward and reach for your left shin, sliding your flexed left food up and over to your right hip. Keep both feet flexed and active, rotating from the hips as opposed to the knees.
- Hold for a few breaths—know this is not a pose you need to hold long, especially if you're just starting to practice it. Exit by taking your legs in your hands and bringing them back to your original seat.
- Always practice crossing both legs each time (once with the right leg on top, once with the left).
Tips and modifications:
- If the full extension isn't in reach for you right now, half-lotus, or Ardha Padmasana, will help you get there. Once the first leg is tucked into the opposite hip, bring the other leg underneath it. Switch and repeat on the other side.
- Pigeon, lizard, and butterfly poses will help you develop the external rotation in the hips necessary for full lotus.
Monkey pose (Hanumanasana)
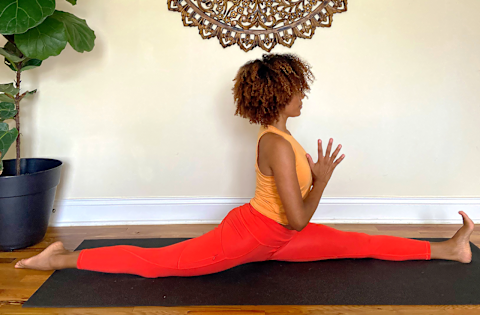
How to:
- Beginning on your knees, bring your right foot a foot in front of you, rotating the thigh out so you're putting weight on the outside edge of your right foot.
- Lean your upper body forward, pushing fingertips into the floor. Start sliding your left knee back, straightening the left leg as you deepen the bend in your right knee.
- Once your left leg can't go much farther back, start sending your right heel forward, internally rotating the leg so your right knee is facing the ceiling. Feel the top of the left thigh and the back of the right thigh get closer to the floor.
- Ensure both legs are in straight lines from the hips and the front heel is engaged, legs active.
- Bring your hands to prayer or extend them up above you and hold for 30 seconds, or as long as is comfortable. To exit, press hands into the floor, and bend the legs in and back to their original positions. Switch and repeat on the other side.
Tips and modifications:
- Practice hip openers and hamstring lengtheners to work on the flexibility needed for splits.
- Use a bolster or folded blanket beneath your pelvis to support you if you can't reach the floor.
Side plank variation (Vasisthasana)
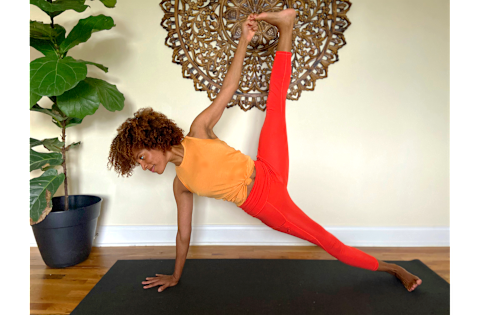
How to:
- Come into plank pose, or a high pushup, with legs extended straight back, and shoulders, elbows, and wrists in a straight line.
- Draw your belly up and in toward your spine. Fill the point where your hamstring meets your glutes, keeping legs active.
- Begin shifting the weight into your right arm. Release the left arm and bring it up, as you tilt your body so hips and shoulders are stacked over each other and the arms form one straight line.
- From here, the left foot will rest on top of the right. Keep pushing the hips up, avoiding sinking into the bottom hip. Engage the obliques. Gaze up past your left fingertips.
- If your body desires more, bend your left leg toward your torso and grab your left big toe with your left index and middle finger. Extend the knee and send your left leg up.
- Hold for 30 seconds and release by coming back into plank. Repeat on the opposite side.
Tips and modifications:
- If you find the bottom hip is continuously sinking, drop the bottom knee to a 90-degree angle, and focus on engaging the core and arms.
Toe stand (Padangustasana)
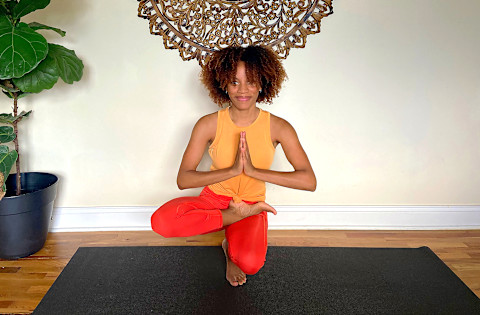
How to:
- Starting from mountain pose, shift your weight into the right leg.
- Bring the left foot in toward the right hip (similar to half-lotus) and take a few breaths here.
- Start to bend the standing knee as you push your left foot into your right leg. If you need to, you can place your fingertips on the ground as you lower into a squat (or you can try to squat without using your hands).
- From the squat, lift your right heel and position the ball of your foot centered under your tailbone.
- Begin to lift your chest up so you're "sitting" upright on top of your foot. If necessary, you can keep using your fingertips to support you as you try to sit up. Lift one hand at a time off the floor.
- Once you find your balance here, bring your hands to prayer and hold for five breaths. Exit by slowly standing back up, left leg still tucked in, and release the leg when you get to standing. Repeat on the opposite side.
Tips and modifications:
- Working both tree pose and half-lotus will allow you the balance and flexibility needed for toe stand.
- If your hip mobility is limited, try squatting low on the balls of your feet with knees squeezing together.
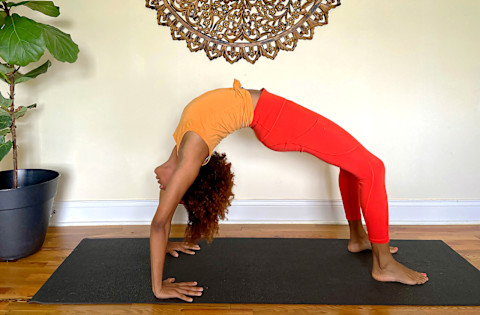
Wheel (Urdhva Dhanurasana)
How to:
- Begin lying on your back with feet hip-distance apart and knees bent so your fingertips can just graze the backs of your heels.
- Bend your elbows and reach your hands up and back, placing them underneath your shoulders with palms flat on the ground and fingers pointing toward your feet.
- Begin pressing your hands and feet into the ground. Without going all the way up yet, lift your hips and shoulders up.
- Lean the head back to bring the crown to the mat, without putting any pressure on your head or neck. Keep elbows tucked close to your ears as you press more into the ground.
- Straighten your arms and lift your head off the mat. Squeeze the knees together, keeping them parallel and in line with the hips and feet.
- Send the hips toward the ceiling and your chest toward the wall behind you. Straighten your arms and legs as much as you can without hurting your back.
- Breathe and hold for 30 seconds. Exit by tucking the chin and slowly lowering down, bringing the knees together.
Tips and modifications:
- Practice bridge pose to warm up for full wheel.
- Practice getting up to step No. 4 if you aren't able to get full wheel just yet.
- Backbends are best in sets of three, so try to do this three times, or two sets of wheels and one full bridge.
- Squeeze a block between your thighs or put a strap around them to keep knees from splaying out.
The takeaway
As with any advanced pose, don't be discouraged if these are a challenge at first—there's a reason they're not beginner poses! But take your time, be gentle, and with a little effort and consistency, you'll be nailing splits and forearm stands in no time.
