Advertisement
7 Graphic Eyeliner Tutorials That Anyone Can Master, From Top Makeup Artists

If you're a makeup fan, you've probably scrolled through TikTok or Instagram and come across some unique eye looks. While dramatic cut-crease applications had their day in the sun for the past few years, graphic eyeliner has recently exploded in popularity—especially when paired with a more low-maintenance eyeshadow look.
For those just dipping their toes into the makeup world, graphic liner simply refers to more stylized ways of wearing your eyeliner. Most people are familiar with well-known staple liner styles, such as the classic, wing, and cat-eye looks. But if you're ready to step up your liner game, these graphic liner tips will help you nail any geometric shape that crosses your feed.
7 graphic eyeliner looks to master.
Even if you're a makeup newbie, don't feel intimidated by these intricate end results: If you make a mistake, you can always start over. Still, it's always a good idea to practice new makeup tricks when you're not in a rush. This is especially true for many graphic liner looks, which require a steady hand and precise applications.
Floating liner.

Named "floating" because the liner is nowhere near your actual lash line, this is actually one of the easiest graphic liner styles to master. And even if you don't have the steadiest hand in the game, there's a hack to create a flawless line every time (but more on that later!).
At its most basic form, floating liner is simply a liner placed anywhere above your upper lash line. However, in most cases, the liner lives just above your eye's natural crease. Better still, this is a liner look where the cheese stands alone: You don't have to rock a full eyeshadow look with a floating liner, and in many cases, it'll be dramatic enough on its own.
Get the look:
- Start by applying primer to the entire surface of your bare lid.
- Choose your medium of choice—a felt-tip liner pen, eyeshadow and liner brush, etc., and consider your liner placement.
- Keep in mind that if you have hooded eyes, you may need to place your liner higher as you don't want it to get lost in the crease. You should be able to see the floating liner even if your eyes are open.
- If this is your first time, you can use a barely there neutral shade of eyeshadow and a stiff-bristled liner brush to trace a practice line before committing with a bolder liner pigment. Try to follow the same natural curve that your lash line offers—only higher up on your lid.
- Once your practice line is in place, trace over it with your actual liner product.
- If you make any mistakes, dip a precision liner brush in micellar water and gently dab any oopsies away.
- Floating liners look fantastic alone—even if you don't paint your lash line. But for a real pop, pair it with a regular cat-eye in classic black or a matching hue with the floating line.
Bold bottom liner.
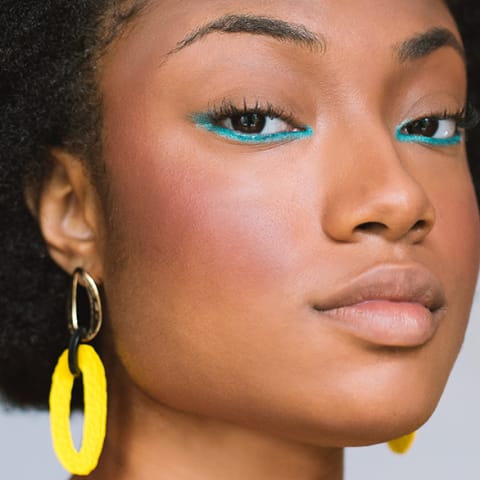
The lower lash line often doesn't get enough love. Thankfully, this look provides a twist on the floating liner look—just for your lower lids.
Get the look.
This trick follows similar steps to the floating liner look, except you might want to avoid getting too close to your lash and water lines. Instead, you're going to target the crease on your lower lids.
- After grabbing your liner of choice, try to follow the same natural curve that your lower lash line offers, just start lower.
- You can opt to stop the line where your lower lash line naturally ends or extend it up slightly to create a reversed-wing look.
Multi-line liner.
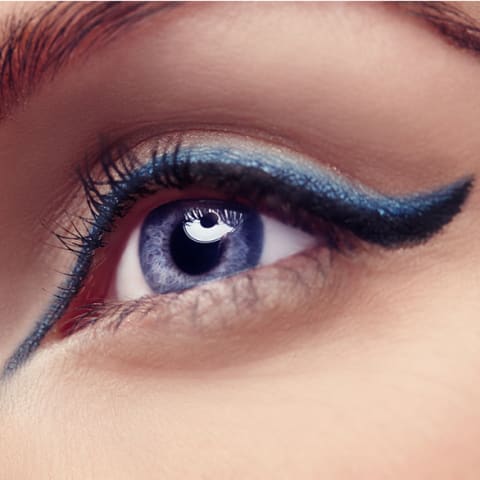
If floating liner feels a bit advanced, there are other ways to get expressive with your liner that doesn't require nerves of steel and an unwavering hand. Enter: multi-line liner. With a multi-line approach, you're going to be stacking liner colors beginning from just above your upper lash line. This is a great look for wings and cat-eye styles.
Get the look.
Multi-liner looks are easier than floating liner since you're following the natural line created by your upper lid. But precision is the key here: For the best results, we recommend picking liners that offer more precision, like felt-tip liners. Or if you want to use eyeshadow, spritz an angled liner brush with water or setting spray before dipping it into your powder to avoid fallout and smudging.
- Begin as you would normally for a wing or cat-eye by drawing as close to the lash line as possible. For cat-eyes, maintain a small flick just past the end of your natural lash line while wings can be more exaggerated.
- Once you're satisfied with the first color, pick another color and begin to apply it directly above the first line. Repeat on the other eye. In theory, you can apply as many colors as you want. But if you're trying to pair this with an eyeshadow look, it's a good idea to stick to just two or three lines.
Gradient liner.

If you've got some patience, the gradient liner look is a twist on a single line that offers a ton of attitude. Similar to the multi-line liner, you can create a look using multiple colors. However, your goal is going to be to create a single cat-eye, wing, Cleopatra eye, or whatever your heart desires, while switching up the liner color throughout the look.
Get the look:
- For those new to gradient liner, try to focus on just two or three colors so you can master the application process by assigning one hue each to your inner, middle, and outer lid. Determine your color lineup, and slowly apply the color to your upper lid—make sure to stop wherever you've designated the color changes should occur.
- Continue with the next color until you reach the next designated color change spot. Finish with the final color, opting for a cat-eye, wing, or whatever finish you prefer.
Stamp liner.
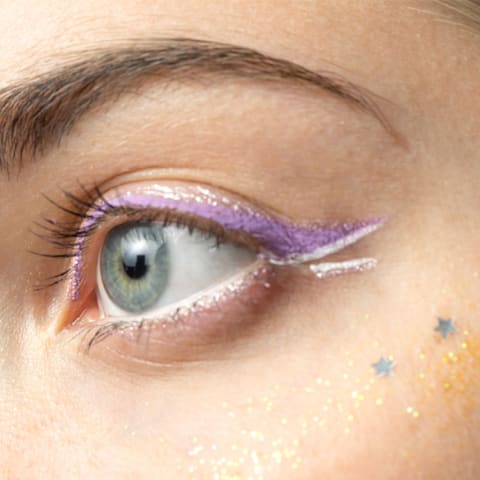
For those beauties who are short on time but still want to do something different with their eyeliner, stamp liners have you covered. Better yet, these no-fuss looks don't usually require as much effort since you can rely on the eyeliner stamps to achieve your look (like this one, from Kaja).
Get the look.
Eyeliner stamps come in a variety of shapes like circles, hearts, flowers, card suits, and more. Or you can even use a regular felt-tip liner to create a simple look, like the dotted eyeliner look:
- For the dotted eyeliner look, line your eyes as you normally would but create a slightly exaggerated winged line.
- Below the wing, use the point of your liner to gently place two or more dots that follow the angle of your wing.
- Repeat on the other side. For best results, ensure that the dots are evenly spaced so it looks intentional rather than accidental.
The Cleopatra.
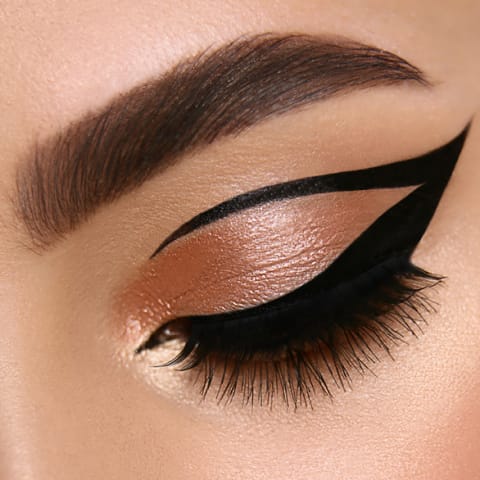
If there's anyone in history who loved liner, it's Cleopatra herself. The beautiful thing about this eye look is that you can make it as dramatic or simple as you prefer. The liner is bold enough to work by itself for a negative space beat, but it can also be paired with an amazing eyeshadow for a head-turning effect.
Get the look:
- The base for the Cleopatra is a wing liner. So begin by lining your upper lash line and drawing a wing (see here for how to draw the classic line).
- Your next step is to create a floating liner just above your crease. If you struggle to do this free-handed, try our tricks farther down.
- On the outer corner of the floating liner, continue the line so that it connects to the wing.
- Depending on your preferences, you can exaggerate the thickness of the floating line and extend the upper portion out for a bolder wing look.
- Also partially line your lower lid—and for this look, thicker is better. Just be sure to leave your inner lower corner unlined so it doesn't make your eyes look too small.
- If you want to apply shadow, consider using a neutral metallic so that the liner is doing all the talking.
Tip: If you like the idea of the Cleopatra but feel the lines are too thick, you can create a thin single-line version of it, which is often referred to as an open-ended liner. It will still make your orbs pop but might not feel as intense as the Cleopatra.
Double-winged liner.
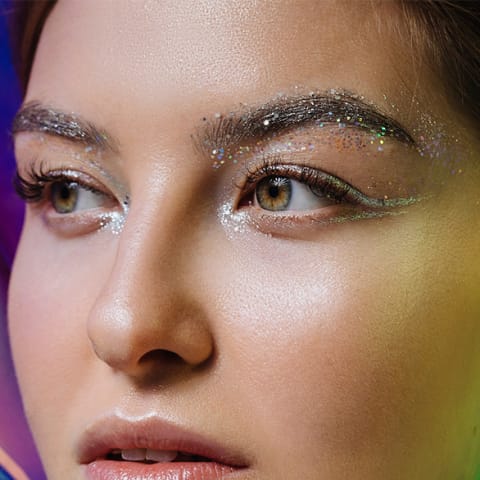
Not everyone wants to rock an in-your-face liner look. If this sounds familiar, start small with the double-wing look (also dubbed "fishtail liner").
Get the look:
- Start by creating a winged line on your upper lid.
- Then line your lower lid, staying as close as possible to the lower lash line.
- As you reach the outer corner, create a lower flick that matches the upper wing. You can also do this with a cat-eye liner, if you please.
Graphic liner application hacks.
Not everyone has the steadiest of hands when applying liner, especially when you're essentially free-styling some graphic shapes. If you struggle with maintaining steady lines or are constantly fighting smudges, you'll appreciate these makeup artist tips:
Product accuracy matters.
For some looks like the double wing or floating liner (depending on how thick you want the lines to be), you can pretty much achieve the style with any liner product, including softer mediums like traditional pencils and gels.
However, many of the looks in our guide are precision styles—meaning, you need a product that lays down a clean line during the application process, is less likely to shift with wear, and doesn't fade as the hours go by. Felt-tip liners and true liquid liners tend to be your best bet. Just make sure that the applicator offers a precision-fine tip for enhanced accuracy. Gels can work, but be sure to spritz a setting spray once you finish your eyes so transfer is less likely to occur.
Eyeshadow can double as liner.
Eyeshadow might not be the best choice for more stylized graphic liner looks, as it can read a bit smoky. But for our multicolor liner styles, eyeshadow can be a fantastic substitute. To make it work, celebrity makeup artist Spencer Barnes notes that he loves "using eyeshadow (in various ways) along the lash lines of my celebrity clients…you can apply your eyeshadow wet or dry—but the key is using a precision eyeshadow brush to deliver the desired effect." He recommends mixing a setting spray with the shadow for more staying power.
Up the ante on your Cleopatra liner.
When it comes to dramatic liner, few styles are as bold as the Cleopatra. Gargi Patel, the celebrity makeup artist behind Vasanti Cosmetics, notes that you can make the Cleopatra liner even more unforgettable by using a liquid or felt-tip liner and drawing "an angled line from your tear duct toward your nose, in a slightly downward projection."
Use a lash curler for floating liner looks.
Grab a lash curler, your liner of choice, and head to your mirror. Note: This works better with the classic metal clamp lash curlers rather than the plastic or miniature versions. You may find that the curved top edge of the lash curler clamp mimics the natural curve of your top lash line. A bonus? You can also use this trick to create cut creases when applying concealer or eyeshadow primer after laying down your base shade.
- Coat that edge with your liner product of choice.
- Hold the curler horizontally so that you're staring directly at the coated edge.
- While looking in the mirror, position the edge slightly above your crease, and then treat it like a stamp—pressing gently into your lid.
- Be sure to hold your hand steady so that you don't smear the liner as you pull the curler away from your lid.
Or use the stencil trick for floating liner looks.
Ever seen those cut-crease stencils gracing your social media feeds? Well, you can achieve a floating liner look with them, too. Usually, they even come with multiple curved shapes for you to choose from. Pick the stencil that appeals most to you, and instead of using a fluffy blending brush and eyeshadow, use your preferred liner product to create a clean, simple line.
The takeaway.
Even if you aren't a trained makeup artist (MUA), that doesn't mean you can't have fun and experiment with your makeup. Learning how to apply eyeliner in different ways helps build your makeup knowledge and skills, and it helps you match your eye look to your mood. With graphic liner looks, all you need is a bit of patience, some time, and a killer liner that won't let you down. Good news: We have a stellar list right here.
Watch Next
Enjoy some of our favorite clips from classes
Enjoy some of our favorite clips from classes
What Is Meditation?
Mindfulness/Spirituality | Light Watkins
Box Breathing
Mindfulness/Spirituality | Gwen Dittmar
What Breathwork Can Address
Mindfulness/Spirituality | Gwen Dittmar
The 8 Limbs of Yoga - What is Asana?
Yoga | Caley Alyssa
Two Standing Postures to Open Up Tight Hips
Yoga | Caley Alyssa
How Plants Can Optimize Athletic Performance
Nutrition | Rich Roll
What to Eat Before a Workout
Nutrition | Rich Roll
How Ayurveda Helps Us Navigate Modern Life
Nutrition | Sahara Rose
Messages About Love & Relationships
Love & Relationships | Esther Perel
Love Languages
Love & Relationships | Esther Perel
