Advertisement
This ad is displayed using third party content and we do not control its accessibility features.
Close Banner
Advertisement
This ad is displayed using third party content and we do not control its accessibility features.

A Step-By-Step Guide To That Macramé You've Always Wanted To Make

Brydie Stewart
Author:
January 13, 2023
Brydie Stewart
Artist an the founder of Mary Maker Studio
By Brydie Stewart
Artist an the founder of Mary Maker Studio
Brydie has a degree as a Visual Arts Educator and has spent decades exploring the creative methods she now teaches to her online community of 150k+ subscribers.
Making art is a shortcut to a flow state1, in which we feel less stressed and more focused, and it's even been shown to boost self-esteem and life satisfaction2. As the $44 billion craft industry grows, thanks in large part to millennials, it is expanding beyond old classics like knitting and coloring books into some more earthy explorations of the colors and forms you'll find in nature. Every Friday for the next month, we're all heading back to class and learning the basics of four of these meditative crafting techniques. Today, we're learning how to macramé an easy and downright adorable rainbow.

What is macramé?

Macramé is a wonderful art form that will encourage you to take some time out from this busy world and delve into your creative skills. I've found that when I'm knotting, time passes quickly and creativity builds. As a macramé artist, I've found the rhythmic nature of the craft to be great for those who wish to relax and unwind, and the repetitive action can become a type of moving meditation. This DIY rainbow is a really fun—and easy!—introduction to the wonderful world of macramé.

Image by Brydie Stewart / contributor

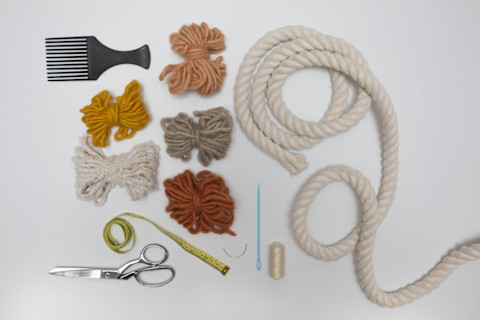
Tools and materials

  • 2.42 meters (8 feet) of Cotton Twisted Rope (I've found that ¾ inch is a good thickness for this project)
  • 5 colors of chunky yarn
  • A tape measure
  • Scissors
  • A large needle, thick enough to thread the chunky yarn through
  • A curved needle
  • Sewing thread
  • A comb

Method

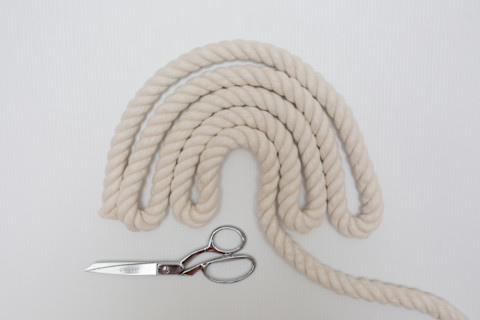
Step 1: To avoid waste, lay your rope out flat to form the shape of a rainbow prior to cutting. Once you have your shape, cut your rope into 5 pieces. We will use the following lengths to create a curved rainbow: 64 cm, 56 cm, 48 cm, 40 cm, and 34 cm.

Image by Brydie Stewart / Contributor

Step 2: Prepare your chunky yarn. It will wrap around your rope to create a textured effect. We will use the following lengths to create a curved rainbow: 15 yards, 14 yards, 13 yards, 12 yards, and 11 yards. Note: If your yarn is on the thinner side, you will need to add additional length. You might want to consider working straight from the ball (not cutting anything ahead of time) in that case.

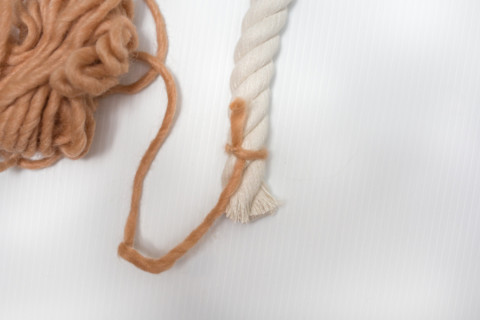
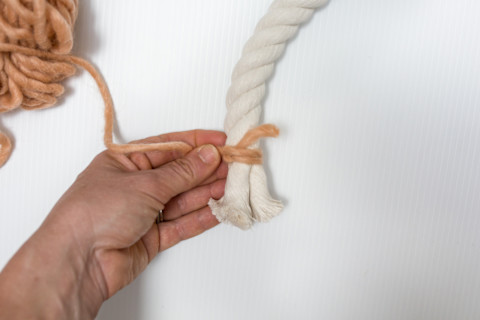
Step 3: Now, it's time to attach your rope to yarn! Take the materials for your largest rainbow curve (64 cm of rope and 15 yards of yarn). Leave 2 cm from the end of your rope and attach your yarn with an overhand knot. Leave the tail facing back toward the rope length.

Image by Brydie Stewart / Contributor

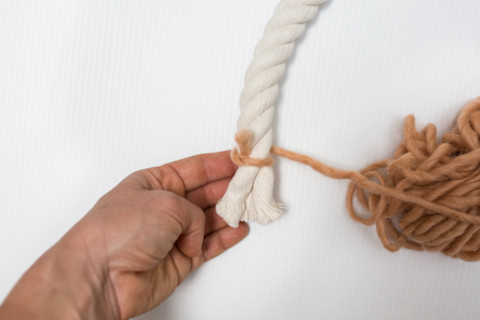
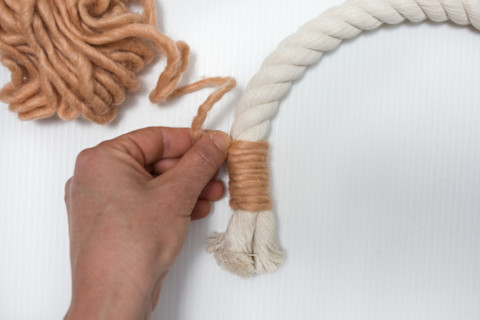
Step 4: Continue to wrap the yarn firmly around and around the rope, covering its tail as you go, until you come to the end. Leave the last 2 cm of rope visible.

Image by Brydie Stewart / Contributor

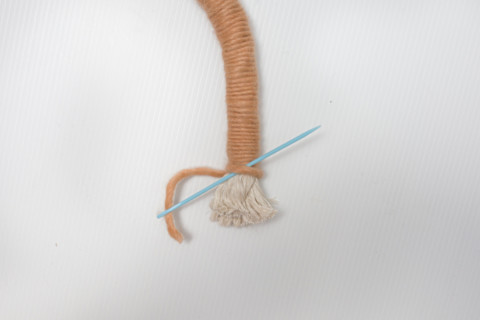
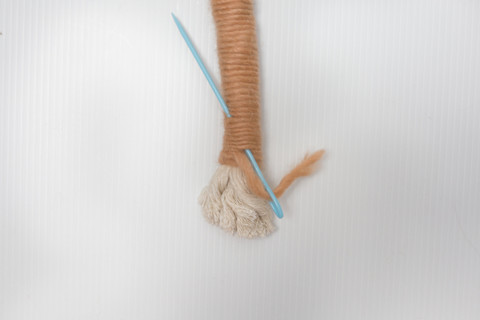
Step 5: Thread your yarn through the large-eye needle. Sew the yarn back through your last wrapping rotation three times to secure it in place at the bottom of your rope.

Image by Brydie Stewart / Contributor

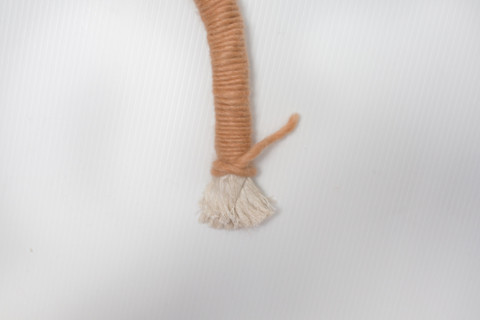
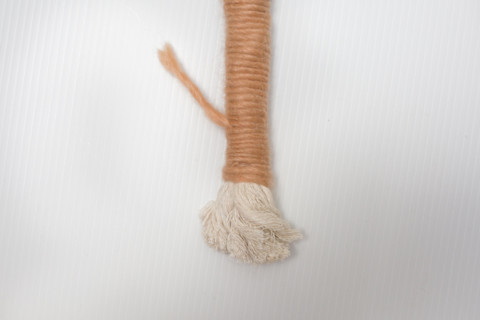
Step 6: Now thread the needle and yarn back up under and through your rainbow curve, covering around 3 to 4 cm. This hides and secures your yarn. Snip the remaining tail once complete.

Image by Brydie Stewart / Contributor

Step 7: Repeat this action with the four remaining curves. Once complete, lay them all together and gently manipulate the resting shape into a rainbow.

Step 8: Working from the back of your piece, use your small curved needle and cotton thread to sew every rainbow curve to its neighbor. They should be as close as can be to one another. (Note: If you don't have a curved needle, a regular one will work too.)
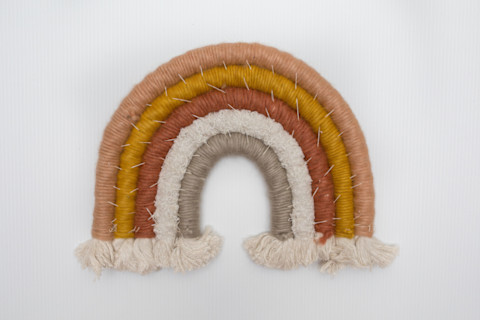
Image by Brydie Stewart / Contributor

Step 9: Take your comb, and brush out the bare, unwrapped rope at both ends of your rainbow. The fluffier, the better! Snip to suit your desired look.

Step 10: If you wish, sew a small split ring at the back of your rainbow to hang.

Check out more of mbg's Craft Week how-to's here.

Watch Next

Enjoy some of our favorite clips from classes

Watch Next

Enjoy some of our favorite clips from classes

What Is Meditation?

Mindfulness/Spirituality | Light Watkins

Box Breathing

Mindfulness/Spirituality | Gwen Dittmar

What Breathwork Can Address

Mindfulness/Spirituality | Gwen Dittmar

The 8 Limbs of Yoga - What is Asana?

Yoga | Caley Alyssa

Two Standing Postures to Open Up Tight Hips

Yoga | Caley Alyssa

How Plants Can Optimize Athletic Performance

Nutrition | Rich Roll

What to Eat Before a Workout

Nutrition | Rich Roll

How Ayurveda Helps Us Navigate Modern Life

Nutrition | Sahara Rose

Messages About Love & Relationships

Love & Relationships | Esther Perel

Love Languages

Love & Relationships | Esther Perel

Related Videos (10)

What Is Meditation?

Box Breathing

What Breathwork Can Address

The 8 Limbs of Yoga - What is Asana?

Two Standing Postures to Open Up Tight Hips

How Plants Can Optimize Athletic Performance

What to Eat Before a Workout

How Ayurveda Helps Us Navigate Modern Life

Messages About Love & Relationships

Love Languages

Advertisement
This ad is displayed using third party content and we do not control its accessibility features.

More On This Topic

more Lifestyle
Advertisement
This ad is displayed using third party content and we do not control its accessibility features.
Advertisement
This ad is displayed using third party content and we do not control its accessibility features.