Advertisement
You'd be hard-pressed to find more than a handful of people who don't sit for more hours of the day than they move. And when you do something over and over again, your body gets really good at doing it. In fact, your connective tissue—the supportive tissue under your skin designed to support, protect, and stabilize you—helps you sit for long periods of time.
However, connective tissue, a.k.a. fascia, also stores energy, so your muscles can do their job while staying connected and balanced. What science is starting to recognize is that if you sit for long periods of time, fascia loses its supportive, elastic qualities, and muscles can become neurologically inhibited so they don’t contract or release when they need to. This leads to neck and lower-back pain, muscle and ligament strains, and injury. It can even accelerate the aging process.
When we sit for long periods of time, we're siting on the backs of our thighs and on our butts. What most people don’t realize is that 80 percent of your gluteal muscles attach to an important fascial structure called your iliotibial band (IT band) and the other, lower fibers attach to the lateral femur (your big leg bone). When we sit, the upper fibers become compressed and shortened while the lower fibers are lengthened. This can cause everything from hip and lower-back pain to cellulite and sciatica to overall poor posture. Just strengthening your glutes—by doing things like squats, running, and plyometric jumping—only increases your risk of injury as your connective tissue has become dehydrated and the important timing of the gluteal muscles isn’t present.
To rehydrate your fascia and release tensions in your back and hip joints, give these two moves a try.
1. SI Joint Shear
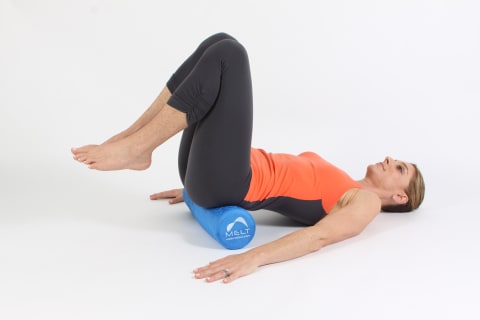
Place a roller (I use MELT Performance Roller) under your pelvis, knees fully bent. Angle your knees slightly toward your head so that your thighs aren’t fully perpendicular to the roller. Maintain a consistent pressure and slowly angle your knees slightly right and left between the one and eleven o’clock positions to explore both sides of the SI joint.
Pause on the right side and shear by making small circles with your legs two to three times in each direction. Then march your knees slowly forward and back two to three times to stimulate the tissue at the SI joint. Maintain the pressure, pause, and take two breaths. Tip your knees to the opposite side and repeat the moves on the left SI joint.
2. Figure 4
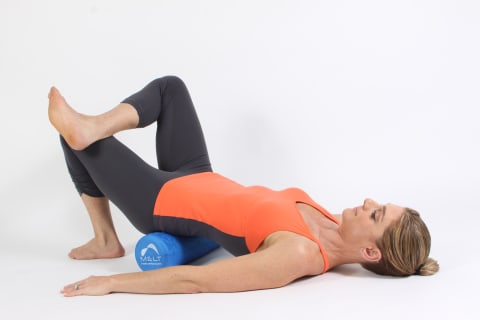
Place a roller under your pelvis. Place your right ankle over your left thigh, flexing your right ankle to support the knee. Breathe in. On the exhale, find your core as you bring your legs up to the level of the roller. Left thigh should be as close to perpendicular as possible.
Place your right hand on your right inner thigh just below the knee and imagine lifting the thigh up and out of the socket gently to encourage length at the front of the hip joint. For added support, you can place your left hand behind your left thigh or grab your right foot, but don’t laterally rotate the pelvis as you hold either position.
Simultaneously push the right thigh up and away from you with your right hand while your left thigh presses into your right outer shin. Once this “push-pull” position is achieved, take a focused breath and actively tilt the pelvis on the top of the roller but don’t let your ribs rise. Sustain the tilt and take two or three focused breaths as you sense the length between your right hip and your right knee on every exhale. Reduce the two-directional intention on the inhale, accentuate on the exhale.
Next, reintegrate the timing of your glutes and gain proper pelvic control with these two moves.
1. Knee knockers.
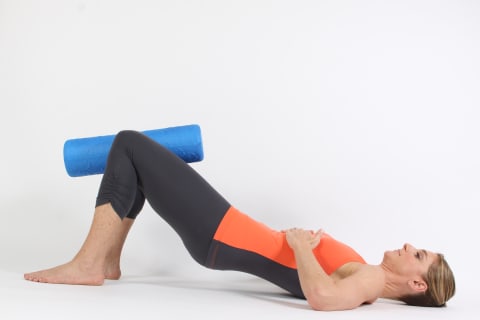
Lie on your back and bend your knees. Place the roller between your thighs close to the knees, while gently pressing your feet into the floor. Without tucking your pelvis, squeeze your knees into the roller while you simply decompress the weight of your pelvis from the roller. Keep the bra line, or mid ribs, in contact with the floor without stressing the neck. Think of reaching your knees toward your toes while also focusing on your footprints being grounded.
If you notice that you press your arms into the floor to lift, cross your arms over your chest. While you keep the squeeze of your knees into the roller and hold for 30 seconds. Try this three to four times.
Lift your hips (four counts), pause (two counts), and lower (four counts). Imagine pressing “under the roller” on the lift as your thighs rotate outward, bringing the pubic bone toward the ceiling. Imagine pressing “over the roller” on the way down as your thighs rotate inward, deepening the hip crease.
2. Side leg lift.
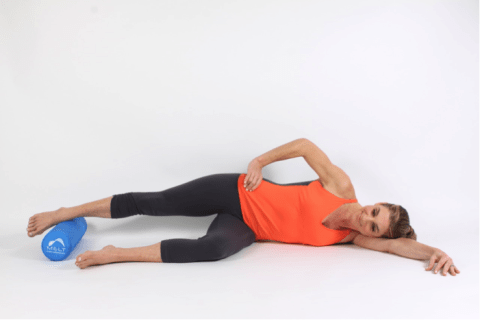
Lie on your side and rest your head on your bottom arm, which should be outstretched and relaxed in front of you. Bend your bottom leg at a 90-degree angle, in line with the mat. Your top leg is straight and your ankle is resting on the roller. Tilt, stack, roll. Tilt your pelvis. Stack your hips by placing your hand on your hip and reaching your top leg away from your hand so the lower waistline feels like it has lifted off the floor slightly. Roll your top hip forward and point your toes toward the floor to rotate your leg slightly. Contact your core.
Next, lift your leg to parallel. Reset your tilt, stack, and roll while keeping your core engaged. Hold for 20 seconds. With the leg at parallel, rotate the leg into internal rotation. With the leg in internal rotation, slowly raise the leg a few inches (two counts) and pause (two counts). Slowly lower back to parallel (two counts) and pause (two counts). Repeat four times.
Next, recheck your tilt, stack, and roll while keeping your core engaged. Slowly lift the leg above parallel and lower the leg to tap to your big toe on the roller without pausing. Slowly lift and lower four to six times.
Want to learn more about how fascia works? Here's everything you need to know about your body's "second skin."
Watch Next
Enjoy some of our favorite clips from classes
Enjoy some of our favorite clips from classes
What Is Meditation?
Mindfulness/Spirituality | Light Watkins
Box Breathing
Mindfulness/Spirituality | Gwen Dittmar
What Breathwork Can Address
Mindfulness/Spirituality | Gwen Dittmar
The 8 Limbs of Yoga - What is Asana?
Yoga | Caley Alyssa
Two Standing Postures to Open Up Tight Hips
Yoga | Caley Alyssa
How Plants Can Optimize Athletic Performance
Nutrition | Rich Roll
What to Eat Before a Workout
Nutrition | Rich Roll
How Ayurveda Helps Us Navigate Modern Life
Nutrition | Sahara Rose
Messages About Love & Relationships
Love & Relationships | Esther Perel
Love Languages
Love & Relationships | Esther Perel


